I was hosting a kids in the kitchen class in my kitchen one morning. The kids were elbows deep in making their own granola bars when one mom wrinkled her nose. I held my breath and hoped she wouldnt smell again. The nervousness filled me as I remembered I had not gotten all my morning chores done that day; the one item left unattended…..cleaning the chicks brooder boxes. Those boxes with stinky chicks and heat lamps cooking it…whew!!!
When we had to redesign our chicken coop, we knew that we wanted to make sure that there was a place to house new chicks that come to our little slice of heaven. I will tell you that in North Dakota, the only place to keep chicks safe and warm was in my storage room. Yep, up to 35 chicks in storage totes filled the middle of my storage room for 4 weeks. It stunk! And not just the situation 🙂 Cleaning their little pens daily was a must to keep things clean and smelling fresh inside my house. It was a lot of carrying tubs inside and out and shuffling chicks here and there so that everyone got fresh air (including the room!) But at our new house! Ooh, we had the beginnings of a barn and more than enough space top create a nursery inside it.
We also very much liked the idea of the chicks, from the beginning, having the exposure to the full grown chickens, aka “the ladies.” Sharing space means sharing germs and the brooder boxes inside the coop lets them acclimate to the germs and the coop while still protecting them while the grow. Now, my hesitation to our design, was that the brooder boxes would be beneath the layer boxes (for the eggs.) Generally speaking, chickens prefer to lay their eggs in a dark, low space. We were asking them to lay in high, bright boxes. When our ladies were hitting the 6 month mark and not laying I swore it was because of our design, so i rigged a temporary slanted roof to the boxes and yes, even, hung little curtains on the boxes to help give them some privacy (to me they seriously looked like shared delivery rooms separated by those hospital curtains on a track :)) But after a couple weeks of them still not laying and me sending my kids on “Easter Egg” hunts every day, I did give into Jason’s rational that it wasnt the design, they just werent laying yet. Of course, he was right and another couple weeks later they did start laying and even in their bright, high boxes. And we have not had any problem with the boxes since. The ladies lay in them just like they are supposed to. They do fight over their favorite just like kids though. Yes, really. We have 11 boxes for 10 hens and they all squwack at each other to get out of the fav when they are ready to lay. I have 9 eggs nearly every day split between 2 boxes. Hens, kids, same thing when it comes to a fav.

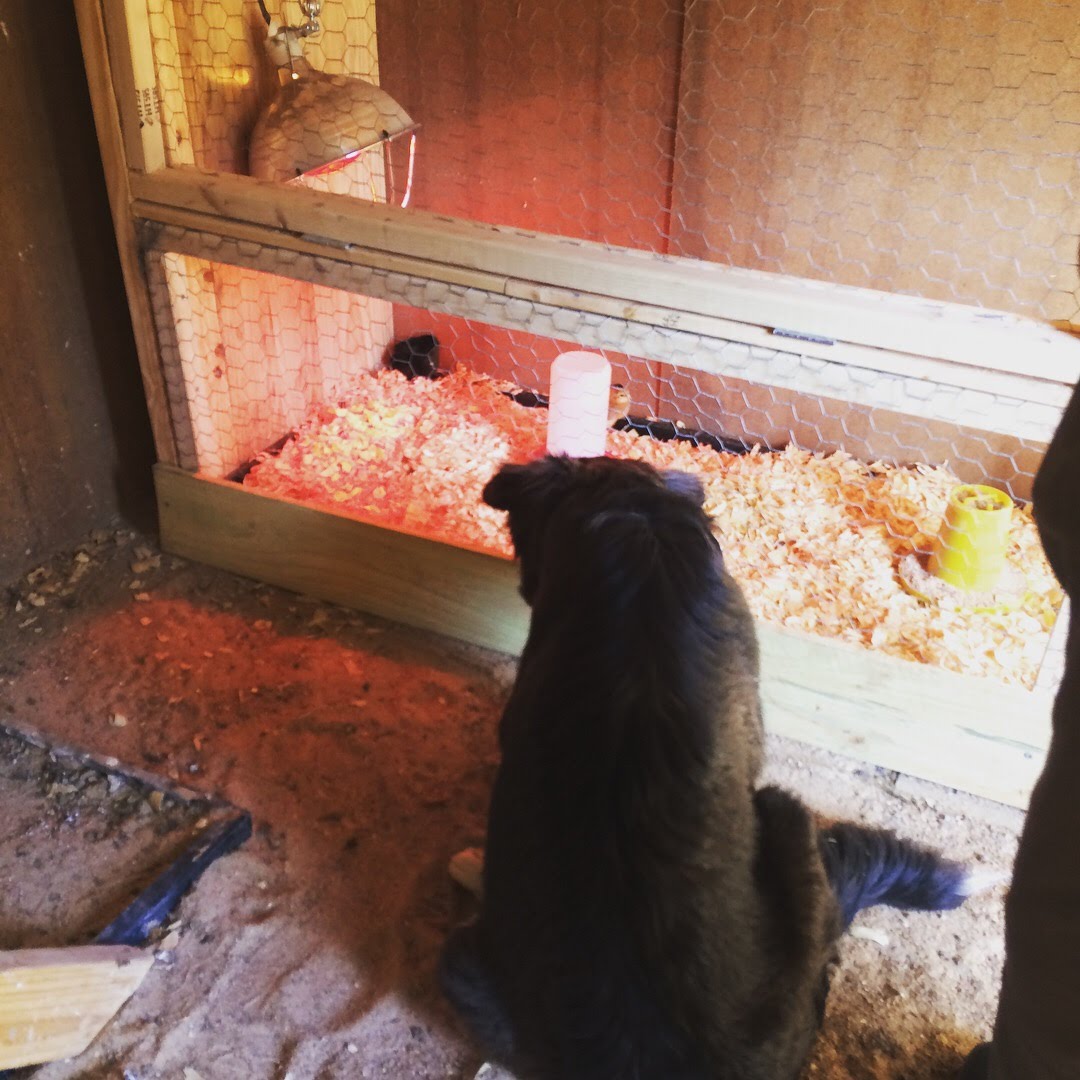
Back to brooder boxes, we built a basic box out of 2x6s and created the front frame with 2x2s and the panels with 1x2s and chicken wire. The top 2 panels are hinged to allow access to the boxes. We have large, rectangular pans in the bottom of the boxes that we remove to clean. Jason used old, exterior telephone clamps he pulled off our old house, to connect the wires for the heat lamps and chords along the seems of the boxes. They were built and perfect…..or so we thought! The trick to building anything for animals is to put the animal in it and they will quickly show you the flaws. Lucky for us this time, there was only 1. Our day old chicks, would squeeze their little, fluffy bodies through the chicken wire!! So on the front of the boxes we had to add a piece of wood along the bottom to keep them in. Truth be told, it was good idea on another front, in that it also holds the wood shavings in and keeps the mess down in the coop.

(Hanker Tanker figuring out what we just brought home.)
Our overall dimensions for the brooder box ended up being 40 inches high, 25 inches wide, 115 inches long. It became tight quarters quickly for 32 broilers (meat chickens) and 4 layers and the broilers had to be moved to their big pen sooner than we expected, but Texas heat helped us out on that one. It was warm enough outside for them to no longer need the heat lamps by the time they were out of room. So now the boxes house just our 4 little layer chicks with oodles of room and next time we do broilers we will have to do half of what we prefer to allow them more space (I’ll explain more later, but when it comes to harvest day doing less than 30 chickens feels like a lot of set up for the number of birds and more than 30 you are not sure you will survive the day.)
As our little layers are getting bigger and we are keeping the hinged doors open allowing them to come and go as they please, I’m learning another advantage to this design…..the introduction of the new girls to the older ones has been a lot smoother! Introducing new birds can be a tricky situation thanks to that real life pecking order, but since the new girls have been in the coop since coming home with us they have slowly been getting to know one another. The little girls still escape to their brooder box at times during the day, but I don’t blame them, the ladies can be a little bossy at times and the “beasties” aka meat chickens/broilers are a little nuts.
Last thing to add to this project is the ramp up to the laying boxes just to make it that much easier for the ladies to do their businesses, but I am calling this design a success, officially declared! There will no longer be chicks in my house or embarrassing smell situations, well I shouldn’t say that I still have three boys living inside! Safer to say I am thankful we all have our own spaces and I’m sure the chicks share the sentiment.

-M

Leave a comment